The integrity of a hardness measurement is only as reliable as the process that produces it. For a Filter Dryer indentation tester, a tool entrusted with safeguarding costly equipment and ensuring batch purity, proper setup and meticulous calibration are not mere preparatory steps—they are the foundational pillars of data credibility. In the high-stakes environments where these testers operate, a minor misalignment or an unverified load can lead to a profound misdiagnosis of a component's health. Adhering to a disciplined regimen of best practices transforms this precision instrument from a potential source of error into an unwavering source of truth.
Establishing a Foundation: The Critical Workspace
Before the tester is even powered on, the environment in which it operates must be deliberately prepared. A stable, level, and vibration-free surface is non-negotiable. On a plant floor, this often means using a heavy, damped inspection table rather than a makeshift cart or a potentially resonant I-beam. The area should be clean, well-lit, and free from excessive air currents, dust, and humidity that could affect both the instrument's mechanics and the operator's focus. For portable units used inside a vessel, this means ensuring the internal surface is clean and dry, and that the tester itself is securely positioned against the component to prevent any movement during the load application. This initial attention to the physical stage sets the tone for everything that follows.
The Precision of Pre-Test Component Preparation
While the tester is designed for in-situ use, the test location itself requires careful consideration and preparation. The surface must be clean, dry, and free of loose scale, paint, or coating at the exact point of indentation. For a curved filter plate or agitator shaft, this often involves gently abrading a small, flat spot with fine emery cloth to ensure the indenter makes full, perpendicular contact. This spot must be representative of the base material and large enough to accommodate the indentation and any necessary spacing from edges. Crucially, the underlying component must be rigidly supported; testing on a thin, unsupported section can yield a falsely low reading due to flex, completely invalidating the result. Proper preparation ensures the material, not its environment, is being measured.
The Heart of Accuracy: Mastering the Calibration Routine
Calibration is the process of aligning the tester's output with a recognized standard, and its regular execution is the single most important best practice. This involves using certified reference test blocks that span the expected hardness range of your components. The procedure must be performed on a schedule dictated by use frequency and manufacturer specification—typically annually for formal certification, but with weekly or monthly user-verification checks in between. During calibration, multiple tests are made on the reference block, and the results are compared to the block's certified value. Any deviation beyond the tester's stated tolerance must be investigated and corrected before the instrument is used for production testing. This process, diligently documented, provides the traceability required for audit trails and regulatory compliance.
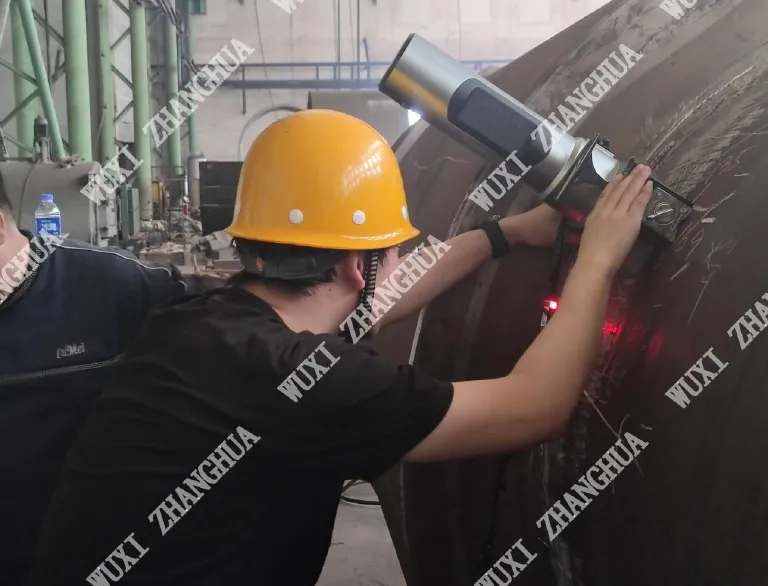
Ensuring Perpendicularity: The Alignment Imperative
For a hardness test to be accurate, the force from the indenter must be applied exactly perpendicular (90 degrees) to the test surface. Any angular deviation introduces a significant error, as the indenter shears into the material rather than pressing directly into it. For flat surfaces, this is often managed by the tester's built-in anvil. For the curved and complex geometries typical of filter dryer internals, specialized fixtures and anvil caps—conical, cylindrical, or V-shaped—are essential. The operator must take the time to visually confirm, and if necessary, use a small machinist's level to ensure the tester's body is correctly oriented before applying load. For critical tests, a digital inclinometer attachment can provide a precise readout. This focus on perfect alignment is what separates a guess from a measurement.

Load Selection and Verification: Matching Force to Purpose
Applying the correct test force is fundamental. Using a load that is too high can cause the indentation to be influenced by the substrate beneath a coating or can over-deform a thin section. A load that is too light may not provide a clear, measurable impression. The choice of scale (e.g., Rockwell B, Rockwell C, Vickers HV1) is based on the material's expected hardness and its geometry. Best practice involves consulting both material specifications and industry standards (like ASTM E18) to select the appropriate scale. Furthermore, for testers with electronic load cells, verifying the applied load against a dynamic force gauge during routine maintenance ensures the machine's internal force generation remains accurate, guarding against drift that could occur from mechanical wear or environmental factors.
The Human Factor: Comprehensive Operator Training
Even the most perfectly calibrated machine is vulnerable to operator error. Therefore, a formal, hands-on training program is a critical best practice. Operators must understand not just how to push the button, but the why behind every step. This includes knowledge of material properties, the reason for specific preparation techniques, the ability to recognize invalid tests (such as those with poor surface finish or edge effects), and basic troubleshooting for common issues. Training should be documented and refreshed periodically. A well-trained operator becomes the most effective quality control check, capable of sensing when a test "feels" wrong and initiating a re-verification of the setup and calibration before proceeding.
Documentation: Building the Chain of Custody
Finally, the entire process must be captured in a clear, unbroken record. This documentation starts with the calibration certificates for both the tester and the reference blocks. For each testing session, a log should record the date, operator, component ID and test location, environmental conditions, the scale and load used, and the individual results. Modern testers with data export capabilities automate much of this, but the principle remains: every data point must be traceable back to a known instrument state and a defined procedure. This documented chain of custody transforms a list of numbers into defensible evidence of material compliance, providing the ultimate validation that the setup and calibration best practices were not just followed, but were integral to a culture of precision.