Plate heat exchangers are widely used in various industries to transfer heat between two fluids efficiently. Over time, the gaskets used in these heat exchangers may wear out or become damaged, leading to leaks and reduced performance. Replacing the gaskets is a crucial maintenance task to ensure optimal heat transfer and prevent costly downtime. In this article, we will provide a comprehensive step-by-step guide on how to replace plate heat exchanger gaskets effectively.
Understanding Plate Heat Exchanger Gaskets
-
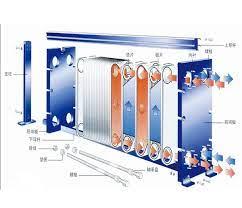
https://www.yojointernational.com/Gasketed-Plate-Heat-Exchanger/Gasketed-Plate-Heat-Exchanger-B100B.shtml are sealing elements placed between the plates to prevent fluid leakage and facilitate heat transfer. These gaskets are typically made from materials such as Nitrile (NBR), EPDM, or Viton, depending on the application and operating conditions. -
Signs of Gasket Failure
It is important to identify signs of gasket failure to determine when replacement is necessary. Common indications include fluid leaks, reduced heat transfer efficiency, increased pressure drop, or visible damage to the gasket. -

Tools and Materials Required for Gasket Replacement
- Tools
- Screwdrivers (flathead and Phillips)
- Adjustable wrench
- Torque wrench
- Gasket cutting tool (if needed)
- Cleaning brushes
- Rubber mallet or dead blow hammer
- Safety gloves and goggles
- Materials
- Replacement gaskets (specific to the heat exchanger model and gasket material)
- Cleaning solution (appropriate for the heat exchanger material)
- Lubricant (recommended by the gasket manufacturer)
Step-by-Step Guide to Gasket Replacement
-
Safety Precautions
Before starting the gasket replacement process, ensure that the heat exchanger is isolated from the system and is depressurized. Follow proper lockout/tagout procedures and use appropriate personal protective equipment (PPE). -
Disassembly
- Use an appropriate tool to remove the nuts or bolts holding the heat exchanger plates in place.
Carefully separate the plates, recording their order and orientation.
Gasket removal
Check the gasket position on each plate.
Use a screwdriver or gasket cutting tool to gently pry out the old gasket, taking care to avoid scratching or damaging the board.
Use a cleaning brush and a suitable cleaning solution to remove any remaining gasket residue from the board. Make sure all surfaces are clean and free of debris.
Gasket installation
Apply a thin layer of lubricant to both sides of the new gasket, following the YOJO-Gasketed Plate Heat Exchanger manufacturer's instructions.
Place the shims over the corresponding board grooves, making sure they line up correctly with the board holes and do not overlap.
Assemble the boards back in their original order and orientation, aligning the holes.
Use a rubber mallet or hammer to ensure a tight fit between the boards.
reassemble
Carefully align the plate and gasket with the heat exchanger frame.
Place the nuts or bolts back into their respective holes and tighten alternately on opposite sides to ensure even pressure distribution.
Refer to the heat exchanger manufacturer's specifications for recommended torque values.
test
After reassembling the heat exchanger, gradually pressurize the system and check for leaks.
Conduct a thorough inspection of the heat exchanger and surrounding area for signs of leaks or abnormal operation.
Monitor the performance of the heat exchanger over the next few days to ensure proper heat transfer and system function.

Maintenance and Best Practices
-
Periodic inspection
Inspect your heat exchanger regularly to identify any signs of gasket wear, leaks, or reduced performance. Early detection can help prevent major problems and reduce downtime.
Clean properly
Clean heat exchanger plates and gaskets regularly using appropriate cleaning solutions and methods. This helps maintain its performance and extend its lifespan.
Correct Gasket Selection
Make sure the replacement gasket is compatible with the heat exchanger's operating conditions, temperature, and fluid compatibility. If you have any questions, please feel free to consult us YOJO, Manufacturer and Supplier of Gasketed Plate Heat Exchanger. -

Conclusion
Replacinghttps://www.yojointernational.com/news/Plate-Heat-Exchangers-Custom-Design-and-Demand.shtmls is a critical maintenance task to ensure the efficient operation of these heat transfer devices. By following the step-by-step guide outlined in this article, operators and technicians can effectively replace gaskets, restore system performance, and prevent costly downtime. Regular inspections, proper cleaning, and adherence to manufacturer guidelines are essential for maintaining optimal heat transfer efficiency and extending the lifespan of plate heat exchangers. By implementing these best practices, industries can ensure the reliable operation of their heat exchangers and enhance overall system performance.